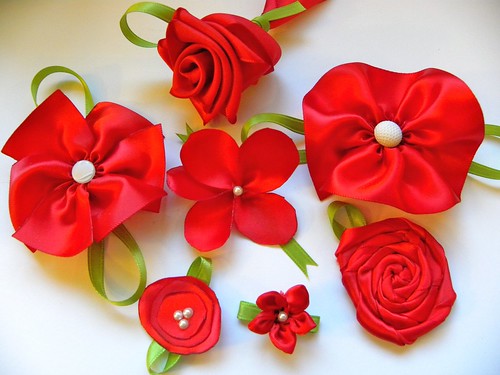
I'll be teaching a class soon that covers how to make a couple different types of flowers. I wanted to post this out there for all as a sneak peak. I've gone ahead and listed these flowers from least challenging to most challenging. I've also added a few tips below about what they might be used for and a couple notes from me about my experiences making them.
But first - what you will need if you want to make these flowers:

The only materials you'll need for making these flowers are:
- Scissors
- Adhesive
- Thick Ribbon (I used 1 1/2" red satin ribbon)
- Thin Ribbon (I used 1/4" green satin ribbon)
- Thread (doesn't really matter what color) and Needle
- Lighter
- Buttons or pearls (for centers of flowers)
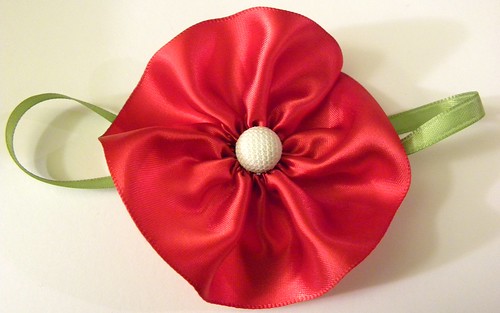
This poppy flower was the first I learned to make, by far the easiest. You just take a long strip of ribbon (I usually use 3-4 times as long as the width of the ribbon) and with needle and thread perform a running stitch along one side of the ribbon. Pull the thread tight so that the flower starts to gather and tie when it forms a tight enough circle. Place a center (like a button, brad, jewel, etc) in that covers the opening left from the gather. A green ribbon looped behind the flower act as "leaves." These work well on flat projects such as scrapbook pages and cards. P.S. The larger your running stitches are apart the thicker (more 3D) the flower will be.
Still Pretty Easy - The Child-Like Flower:
This child-like flower looks a little more abstract then the others I've made before, but it goes together pretty fast and has a different look. Cut your ribbon in descending sized circles, I typically use three but you can go down to two or up to about 5 or 6 depending on how many layers (which look like petal layers) you'd like. After sealing the frayed edges of the petals (I use a lighter to burn the edges) you can start to assemble the flower. Just layer the circles with the largest on the bottom and up to the smallest on top. Add a center like these pearls and the green ribbon looped behind to make the "leaves." Perfect for flat projects and can be made pretty small in diameter. I learned there from a blog where the originator was making them so small they were post earrings!
The Mid of Ease - The Modified Poppy Flower:

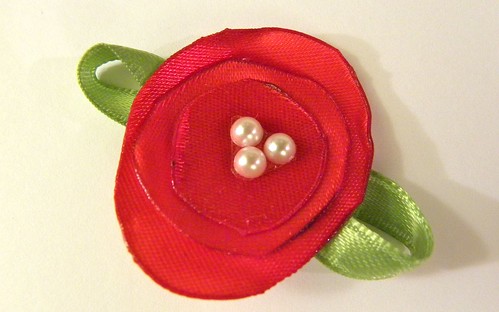
This modified poppy flower is very similar to the basic Poppy Flower. You take your long strip of ribbon (I usually use 4-5 times as long as the width of the ribbon) and cut it into 6 even sized pieces. Then with needle and thread perform a running stitch along one side of the different ribbon pieces, just like you did with the basic poppy. Pull the thread tight so that the flower starts to gather and tie when it forms a tight enough circle. The pieces of ribbon will overlap and form petals. Place a center (like a button, brad, jewel, etc) in that covers the opening left from the gather. A green ribbon looped behind the flower act as "leaves." These work well on flat projects such as scrapbook pages and cards. P.S. The larger your running stitches are apart the thicker (more 3D) the flower will be.
This modified poppy flower is very similar to the basic Poppy Flower. You take your long strip of ribbon (I usually use 4-5 times as long as the width of the ribbon) and cut it into 6 even sized pieces. Then with needle and thread perform a running stitch along one side of the different ribbon pieces, just like you did with the basic poppy. Pull the thread tight so that the flower starts to gather and tie when it forms a tight enough circle. The pieces of ribbon will overlap and form petals. Place a center (like a button, brad, jewel, etc) in that covers the opening left from the gather. A green ribbon looped behind the flower act as "leaves." These work well on flat projects such as scrapbook pages and cards. P.S. The larger your running stitches are apart the thicker (more 3D) the flower will be.
Getting a Little Harder - The Flat Rose:

I usually make this flat rose with a surface covered in a slow setting adhesive. You just twist the ribbon (or fabric, etc) and then create a flat spiral to form the shape of the rose. A small "leaf" made from green ribbon completes the look. These are work well for flat projects - like cards or scrapbook pages. P.S. I label these as a little harder mostly because of the tidiest part of getting the twist even... if you have uneven sized twists in the ribbon the flower will be lop-sided.
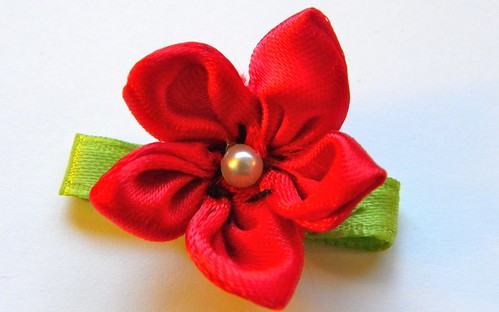
Somewhat Challenging - The Tropical Flower:
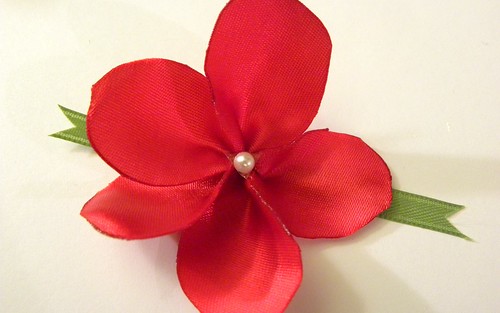
This tropical flower (sometimes called a hibiscus) requires a little bit more effort. First you take your ribbon and cut 5 petals that are tear shaped from the ribbon. After sealing the frayed edges of the petals (I use a lighter to burn the edges) you can start to assemble the flower. With needle and thread you stitch each pedal so the it folds in half and overlaps with the next pedal. after all the pedals are on the thread just tie the ends and correct any form issues. A green ribbon with simply cut ends forms the "leaves". Finishes the look with a small button or pearl in the center of the flower. These work well on semi-3D items and look very nice on barrettes and hair ties/bands.
This tropical flower (sometimes called a hibiscus) requires a little bit more effort. First you take your ribbon and cut 5 petals that are tear shaped from the ribbon. After sealing the frayed edges of the petals (I use a lighter to burn the edges) you can start to assemble the flower. With needle and thread you stitch each pedal so the it folds in half and overlaps with the next pedal. after all the pedals are on the thread just tie the ends and correct any form issues. A green ribbon with simply cut ends forms the "leaves". Finishes the look with a small button or pearl in the center of the flower. These work well on semi-3D items and look very nice on barrettes and hair ties/bands.
Challenging - The 3D Rose:
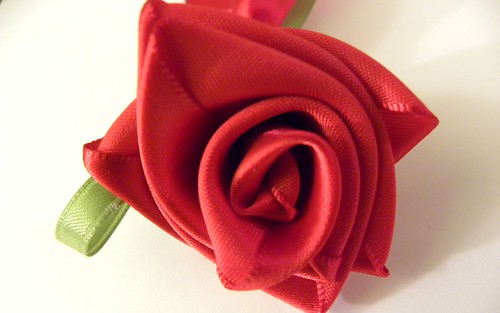
This 3D rose, although very pretty, definitely a little hard to make. These are made from a very long strip of ribbon (I typically make mine with at least 1' of ribbon to each 1" of width. The rose is made by folding the ribbon in a almost square pattern and then twisting the ribbon together to form the bud-like rose. The ends of the ribbon are then secured by stitching the base of the rose. Green ribbon is added to form the "leaf" and also stitched around the base to form the bottom of the rose. A stick or wire can be added to form the stem of the rose if desired. These roses are very 3D and are best given as "faux" roses or used in clothing or decretive hair items like burettes, etc. P.S. These roses are very difficult to make from ribbon less then 1/2" thick. Additionally, they look best with a silk ribbon (used here) but work best and are easier to make with a less smooth ribbon like just plain cotton.
Hardest and Most Challenging - The Full Flower
Okay, this is a bit of a hard bugger! I have actually included some drawings to describe how this is done... as it's a little hard to understand from just written instructions.
You will start with a circular template, I just use a punched-out circle of paper. The size of the circle will determine your flower's size. Fold the circle in half and cut it creating two half circles.Fold each half circle piece into a quadrant with the wrong side out. Using straight stitches sew the straight side of the quadrant on the edge (a). Turn the piece right side out. Do the same for all six of them.

Next sew on the curved side of each petal piece with a running stitch one at a time (b) as shown above. Space the stitches evenly as you will need to pull at the thread at one end to create the folds as show below. For each petal piece, secure the folds with ties before doing the same for the next petal. At the end of the sixth petal, attach it to the first petal to form the base of the flower.


P.S. Make another set of petals to use as a base - I suggest using contrasting colors. These can be the same size as the first set or different. Sew the smaller set on top of another. P.S. 2 The smaller the circle the harder these are... using the 1 1/2" ribbon I used the flower was quite small - as you can see compared to the other flowers shown.


No comments:
Post a Comment