Wednesday, December 30, 2009

Beautiful


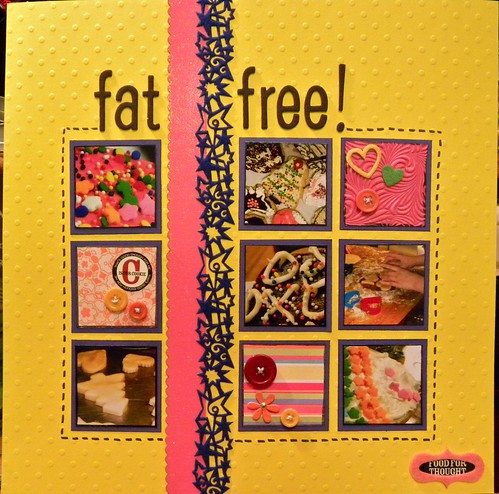
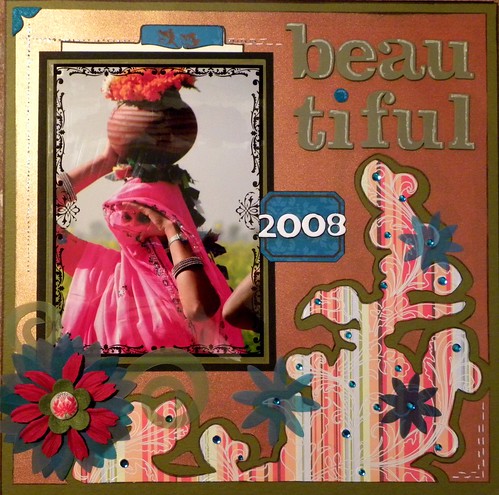
Ever since I took this picture I've wanted to scrapbook it in a really special way. I think I finally did that today when I used an interesting outline technique I've done before but this time I went a little more elaborate on the embellishments. The colors of this layout were inspired by all the vibrant colors I saw while in India (where this photo was taken) back in 2008. I certainly used a good collection of bling on this page with Stickles, Rhinestones, and even shiny paper! The main photo is also covered with a 5"x7" overlay I'd had around and was waiting to use on something fun!
The best thing about this layout is the teal tab at the top of the photo area... yup, hidden journaling that slips behind the photo itself.
I wanted to talk about this image and what feelings it invoked in me, but I didn't really have room on the layout! Again, not my first time with the hidden journaling technique, and I like how it turned out. If you're ever thinking of doing something similar, the one suggestion I can give is to plan it out ahead of time. Double and triple check the adhesive areas and then finally -- here is the best part -- have a stop and/or guide points for the journaling to sit against. Otherwise I've found that the journaling just goes all over the place and can really detract from your layout when it doesn't sit in the right place.

Bright Colors


Wowza! Those are some bright colors! Well, for these bright cookies I thought I'd stick to paper that matched. :D
This layout is pretty simple. It just has six 2"x2" photos. Those above are just some random shots from making sugar cookies for christmas. I know, I know... you're likely wondering well where does it say that... or the year/date for that matter. It's okay, I didn't feel like putting this on the front via journaling or a title... so it is written on the back for all the years to come!
The yellow paper I've had forever and forget where I got it from, but it looks perfect and has a slight embossed dot pattern. Actually, that dot pattern came in handy several times while creating this layout. Since the layout is a grid pattern, I was able to easily line everything up but --- well -- following the dots!
This layout is a little off for me -- it's the Pink! I hardly ever use pink on anything... really, I think I can count the number of pages I've done with pink on one hand. I actually had to peck around to find a few embellishments that were pink -- most of my pink items I give away knowing they'll usually just gather dust in my scrap room. The pink glitter strip on this page is from a DCWV glitter cardstock packet I got recently. I hadn't had the chance yet to rip it apart and toss the pink to another crop buddy.
The letters are new to me too -- I got them on sale at a great buy for just $1! Yikes, I know... I got 4 packages! They are the American Crafts Cloth Thickers. I've always likes this font and I needed "e"s again so I had to crack open another package.

Tuesday, December 29, 2009

Christmas Pictures


Well, I'm sure there will be more to come after this layout -- but this is my first layout from the 2009 Christmas pictures. It's a fun layout that uses up some of my older Christmas papers (from DCWV paper pack I've had for over 2 years!). Also, got to use some fun combos of American Crafts letters! I love this white font -- I think I have about 4 packages of it becuase I keep using up all the "e"s... and I refuse to use a 3 backwards for an "e" ... sorry folks it doesn't look okay... it looks like a 3 backwards! Oh! On to more photos!

Monday, December 28, 2009

More Teal Glittery Letters


I really found I like the look of the Teal Glittery Letters I used on the Me Layout. Since they are so nice I decided to create another layout with them. I think that some people might be intimidated by mixing teal and bright orange ... but not me! Orange is my second favorite color to scrap with (green being the first). Also on the layout I played a bit with a doodled frame around the edge of the layout ... I saw this same technique on a layout in a store except it used half circles as the "notched" out part. I didn't have a circle punch of the right size and just knew that I'd mess up a hand cut attempt. So, instead I used a single spoke of my star punch. The points kind of look like more arrows ... and I just thought it added a little extra to the entire piece.

Two New Scrapbooking Things for Me


For the last week or so I've been mostly producing a lot of cards -- this was because I wanted to cleanup some of my scraps (my scrap drawer was full!). I'm a little done with card making for a little while! :D
I decided today I would try to use some of my larger scraps with a scrapbook layout. I also chose to try two new things for me:
1st a new technique where distressing the edge of a page is taken to a whole new level! If you can see from the layout above, this technique uses a very rough distressing and tearing of the edges of the page to actually reveal a new color below. I think this worked out pretty good for this layout -- the peaks of teal paper along all four edges really helps to almost frame the layout. It was a little scary tearing up the edges so brutally - it took me a little of holding my breath and I went really slowly removing just a bit at a time.

2nd a new product! Yeah, always love new fun pretties! In this case very pretty! The product is something that I got from my local craft store -- they were very beautiful teal glittered letters. They are meant for wall decoration -- but I think they look wonderful on my layout! I'm pretty sure I'm breaking the "no acid" with these letters -- but the image and layout is more for fun then long lasting. I have the image in other layouts and don't need this specific layout to last my life and beyond without yellowing. I think it came out pretty nice. :D

Sunday, December 27, 2009

Zig Emboss Pen


I saw a fun card made from a patterned paper filled with words - on word was highlighted by a frame to point to the subject of the card. I figured I could try this myself and make a handmade pattern of words and highlight the one that I wanted to most highlight. To do this I used a Zig Emboss Pen. I first wrote out several words (in this case words related to love and my husband) in a random pattern with the pen. I then applied black embossing powder to the words and heated. One single word - Love - was embossed with gold powder. I'm not sure I have the color combo down - as green didn't seem to highlight the card well. :( However, a work in progress -- I hope my hubby doesn't mind getting a few of these as I experiment more. :D

Saturday, December 26, 2009

Copy a Card

Man! I don't think I like glitter rub-ons! I tried to use my first one today and just about tossed it out! If it wasn't such a pretty thing (and expensive!) I would have given up. However, some acrylic and some diamond glaze later and the thing was saved!


I decided to try and use the saved butterfly glittery rub-on it on a copy of a previous card that I made. With a change in color pallet -- the 1st card was in red tones and the second in green and blue tones - the card looks fairly different. I LOVED the way the 1st card looked. And the second take wasn't too bad -- but not as good as the first one.

This card layout was inspired by another card, but it really took on a little life of its own as I worked through putting it together. The bling of the butterfly was a bit of a challange to balance out on the card -- I finally decided to use a more natural fiber strip piece to help with that balance.

So, now what am I going to do with the rest of the sheet of glitter rub-ons!?! Well, this is really sad but I might just cut them out and adhere them the old fashion way -- with glue and give up on the whole rub-on chore! HAHA!

Friday, December 25, 2009

Quilling


I've always loved the art of quilling and today I decided to pull out some of my quilled pieces and use them on some cards.


This card was just cute as could be -- I'm guessing I'll put a sentiment inside to the affect of "Everything will be okay" for a type of sympathy card, or encouragement in a tough time.

And one can never have too many "THANK YOU" cards -- so here is another one for the pile for some deserving recipient.

Button Animals


So, I was wondering what else I could do with my various buttons, when I decided to see about making them into cute little animals.
Now this is a very cute way of using up your buttons -- but let me warn you that it takes a long time to make the really detailed ones! Worth the end result! I started putting some on cards -- how precious is that!

Wednesday, December 23, 2009

Teaching Scrapbooking Classes in Jan 2010

January 2010 will be a fun filled one for me! I have two scrapbooking classes that I'll be teaching at two different stores in the San Joaquin area.
Memories for the Making (MFTM), Lodi Ca is my first class in 2010 - and it's my first class at MFTM! Here is a sample of one of the layouts from this class -- I call it Thinking Outside the Box!

I'm very excited to teach there, and well, lets face it - scrap with all sorts of new people! Sharing in paper crafting is why I teach!

Toward the end of January 2010 I have another fun Mini Tag Book class at My Scrapbook Dreams (MSD), Stockton Ca. Here is the cover of this fun mini book. By just changing out the "party" in the title you can make all sorts of custom titles! Just think of all the title posibilities -- "it's baby time," "it's us time," "it's sports time," and what about "it's scrap time!"
This class is going to be a blast. I normally teach Scraplifting 101 with just 12x12 examples and I'm please to be showing this same concept in a Mini Book format.